Wednesday, November 28, 2012

Floor Cleaner

I don't think there is anything more disguising then walking barefoot across a dirty kitchen floor.  Stepping on sticky patches of yogurt or soggy pieces of cheerios really grosses me out. 

For a long time I mopped my kitchen floor with water and Castile Soap.  It worked very well.  But now, between a larger kitchen and a tiled entry way, I have 3 times the amount of floor to mop.

My simple water and Castile Soap wasn't keeping up.  Halfway through mopping I would have to empty and refill the sink with fresh mopping solution because I was basically just pushing dirty water around the floor

I found this Floor Grease Cutter Cleaner (say that 10 times fast)
1/4 cup white vinegar
1 tablespoon liquid dish soap
(I used Castile Soap)
1/4 cup washing soda (There is a difference between washing soda and baking soda.  You can find the washing soda in the laundry section of most stores.)
2 gallons tap water, very warm
Directions:
1. Place all the ingredients into a bucket and mix well until sudsy.

2. Mop the area with the solution.
3. Not recommended for waxed floors--it may make the wax gunky.

I really wanted to put this to the test so I didn't mop my floor for 2 weeks.  This was really hard for me considering I mop twice a week. By the time the two weeks were done I felt like Miss Inch walking into Susan's (or Sharon?) cabin on Parent Trap with the grass and mud all over the floor.

I mixed all my ingredients in the sink then used a real state of the art (insert sarcasm) sponge head mop. (I almost typed sponge bob ha ha)

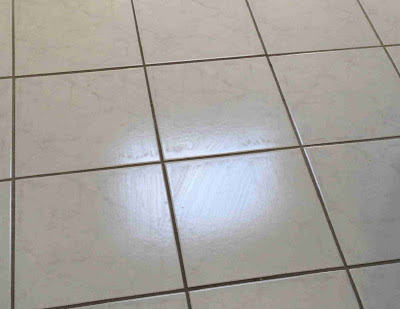
The Verdict: This is one of those homemade solutions that definitely lives up to the hype.  I have used it 4 times now and I am still amazed at how easily things come up off the floor.  I don't have to scrub as hard to get 2 day old hardened milk off the floor.  And what really blows me away is that I don't have to refill the sink with new solution.  No matter how dirty my floor is, the dirt stays in the water.

Look how dirty this water is, but for some crazy reason the dirt stayed in the sink so I was still mopping with clean solution.  My floor is so much cleaner now.

There is a down side.  It leaves streaks on the tile that are pretty noticeable in the light.  However, I'll take streaks if it means a cleaner floor. 


Sunday, November 25, 2012

Spa Kit Giveaway


That's right, I am jumping on the "bribe your readers so they will advertise for you" bandwagon.  

You have two chances to enter
1) share this link on the social sight you use the most (ie: facebook, google+ etc)
2) Pin this link on Pinterest

Let me know how and where you have shared this link by either leaving a comment or by emailing me at thediyguineapig@gmail.com.  Be sure to tell me if you have done a social sight and Pinterest so you can be entered twice. Please leave your full name so when I announce the winner there won't be any confusion.

The winner will get a homemade spa kit that includes;
Eucalyptus and Honey Bubble Bath
Citrus Sugar Scrub
Lavender Bath Salt
an Oatmeal and Lavender Soap bar

It will come pre-wrapped in this cute wire basket so you can either pamper yourself or give it away as a Christmas gift. 

My only restriction is that you must live in the U.S.A.  Sorry, but my small budget can't afford to ship international.

The winner will be chosen at random and posted on this blog on Sunday December 9th 2012

Good luck everyone. 


Wednesday, November 21, 2012

Homemade Mayo

If you haven't noticed yet, I post every Sunday and Wednesday night.  Since tomorrow is Thanksgiving I am going to keep this one short and sweet. But be sure to check in on Sunday night because I have something awesome planned.

so.... blah blah blah something personal blah blah attempt at humor....

Very Cheap Easy Mayo - for the ingredients and directions, please visit the original website

 The first time I tried this it was a disaster.  It was lumpy and oily and really gross.  I tried again but with half the recipe and it came out perfect.  I have made it several times and this is always the case.  If I try to make the full recipe it doesn't work, if I half the recipe it comes out great.  I have no idea why this is.

 The Verdict: This took me awhile to get use to because it has a strong oil taste that I wasn't fond of.  But after using it for 3 months it's fine and I don't even notice the oil taste anymore. This has good and bad with it so let me break it down.
Pros: very creamy and easy to spread.
         Easy to make
         You can add all sorts of spices to it to change the flavor
Cons: You have to use vegetable oil. Any other oil just messes it up. 
          It doesn't taste like Mayo.

If this is something that you plan on making then let me give you a tip; pour the oil in very slowly and a little bit at a time until you get the consistency you want.  Every batch I have made I used a different amount oil.  I think the amount of oil used is tied to how well the other ingredients are whipped together.

Some more blah blah, another attempt at humor, blah blah, insert sarcasm aaaaaand were done.

HAPPY THANKSGIVING!!!!

P.S. this mayo doesn't get crayons off the wall


Sunday, November 18, 2012

Trying to Get Long Glorious Hair

Most of my life I have had long hair.

I would let it grow to about this length, then get bored with it and cut off about a foot then repeat this process.
I love having long hair because there are many different things I can do with it.  Like put it up in a ponytail so it's out of my face.

A couple of years ago I decided I wanted something new.  Something extremely new.  I wanted to look less like a frumpy pony tail mom and more like a cute stylish mom.

So I went to one of my beautician sisters and told her to chop it and die it

 I took me several days to get use to it but I loved it.  I loved that I looked put together and I LOVED that it was stylish and out of my face. Plus, I always had awesome bed head in the morning.


However as time went on I discovered something..... I’m lazy and not high maintenance.  Even though it took me about 10 min to do my hair, I wouldn't do it.  So I became a hat lady.  This resulted in being an even more frumpy mom then I was before.  At least a pony tail can be somewhat stylish, but a 'Life is Good' hat every day is just sad looking, especially with slacks and a collared shirt. Ok I wasn't that bad. 

I kept the style for a year then decided I wanted my long hair back.

Thus we come to today’s blog post.  I found a website that gives you 30 Natural Remedies to Make Your Hair Grow

Most of them are things that I have heard of before such as not washing your hair as often, using less products and try not to brush it when wet.

But there were a few that I had never heard of and I wanted to try some of them.
I measured my hair to see how long it was, then I measured my roots to see how fast my hair grows in a month. My plan is to try each method for a month, then re-measure my hair to see if it actually grew faster.

I started with the Apple Cider vinegar rinse.  The website says

If you’re looking for really long hair, apple cider is the trick! Basically, you want to mix apple cider vinegar with a bit of water and then use it to rinse your hair after every shampoo. This will stimulate your hair follicles and help it grow much quicker! 

I love that they use the word 'bit'.  What the heck does that mean?

So I decided to get really scientific, and wing it.  While I was in the shower I would pour some of the vinegar in a cup then put some water in it.  I have no idea how much I put in there and it was a different 'bit' every time.

I would wash my hair then attempt to carefully pour the stuff on my head and massage it into my scalp and rub it all over my hair.  I'm not a fan of the smell of vinegar and thankfully the smell didn't stick to my hair. 

The Verdict: EPIC FAIL!!! Let me explain why this was so bad.
The first time I used it, it was great.  My hair felt so clean because the vinegar was a great clarifier.  However, the more I used it the more I realized that the vinegar is apparently politically correct because it didn't discriminate what it was stripping from  my hair.  Not only did it take away the bad stuff but it also stripped away all the good stuff that my hair needs to be thick and healthy. I was left with sad limp straw like hair.

I was debating if I should continue with this rinse and then one day I woke up to see about 30 strands of hair on my pillow. No wonder my hair was feeling so thin, it was falling out.  My hair went from making Fabio jealous, to being jealous of Gollum

I plan on using apple cider vinegar every so often as a clarifier, but not as a regular rinse.  It took about 6 weeks for my hair to feel normal again.

Even though I only made it 10 days with this method, I decided to measure my hair at the end of the month just to see if there was a difference in how fast my hair grew..... there wasn't.

Let’s hope the potato mask I’m getting ready to try doesn't leave me completely bald. 


Wednesday, November 14, 2012

Chalk Board Paint

Thanks to my Little Picasso, I have learned that most paint colors and finishes can be used as a chalk board.

Allow me to demonstrate, but first, you should know that for some reason my camera refused to show the true colors of the paint on the walls, so you will just have to take my word for it.

Here is a light tan, flat finish with blue chalk

Using a regular chalk board eraser, the chalk came right off.

Here is a gray, glossy finish with yellow chalk

Again, I used a regular chalk board eraser, but if you look closely you can see that there is a slight mark left behind after I used the eraser.  A wet cloth took it right off.

And finally, an olive green, flat finish with white chalk (I promise that the paint is an olive green) Did anyone else make these awesome S's about 20 years ago?  My Trapper Keeper was covered in them because it was the only thing I could draw.

Comes right off.


Painted walls work so well as a chalk board that if I didn't have little kids watching my every move I would probably write on the wall at the family command center.

I saw a post about making your own chalk board paint that I wanted to try so I could see if it was better then my regular painted walls.

The directions are simple;
Pour 1 cup of paint into a container. Add 2 tablespoons of unsanded tile grout. Mix with a paint stirrer, carefully breaking up clumps.

I built this play kitchen for my kids for their Christmas gift and I wanted to put the chalk board paint on the fridge doors. (Please don't judge my craftsmanship. Due to some cheap wood and my lack of skills, this kitchen was doomed from the start.)


I headed to Lowe's to buy the grout. Because of some recent home repairs, and building this kitchen, I have recently spent countless hours in Lowe's.  I thought I knew the store better than Tim the Tool Man Taylor, but after wondering around the store like an idiot for awhile, an employee finally pointed me in the right direction. I found myself in a section that I didn't know existed.  I quickly realized that the section I know so well is actually the "Lowe's for dummies" section and I was now in the "Lowe's for people who actually know what they are doing" section.

I got to the aisle with tile grout, took one look around and realized that I was seriously out of my element.  

Do you remember that Hardee's/Carl's Jr commercial where a man is standing in the bread aisle looking completely lost and stressed out, then you hear a voice say "without us, some guys would starve."
I felt like that guy.

I put on my game face and started to read the labels. Meanwhile, my 2 year old daughter had dumped a box of bolts on the ground and was doing snow angles in them. I was really tempted to give the grout aisle the bird and join her. 

I finally picked a grout that I assumed was unsanded because it was the only one that didn't say that sand was in it. 

I mixed it into my paint and quickly saw that it was pretty gritty.  Looks like I got the wrong grout.  But I thought, what the heck, I'll paint it on then sand it off if needed.


After the paint dried on the doors it was very obvious that this was sanded grout.  I tried to write on it with chalk but the sand just ate up my chalk and left chalk dust on everything.  However, I decided to keep it because I like the texture that the sand gave the door. 


The Verdict: Inconclusive. I bought the wrong grout so I don't know how adding unsanded grout to paint compares to regular paint and I really don't want to buy another thing of grout just to test it on a piece of wood that I will toss.

So for now, my painted walls with no grout in them work just fine as a chalk board. 


Sunday, November 11, 2012

Goodbye Shower Mold

Do you remember my shower with the nasty grout?  I wish that cleaning the grout was the end of it, but unfortunately that was just the beginning.

When I showed you those embarrassing photos of the grout I made sure to avoid getting any photos of the caulk between the tiles and the bottom of the shower, but it's time to come clean (literally and figuratively) and show you the truth...

I, the DIY Guinea Pig, have had moldy caulk.
PHEW!!! Feels good to get that out, but I still need to show you...

prepare...


 BAM!!!!!
Pretty gross right?


I tried every combination of vinegar, baking soda, washing soda, and hydrogen peroxide that I could come up with and nothing worked.  At one point I think I actually went through the 5 stages of grief;

1) Denial - "My shower isn't that bad! It's not like an episode of Hoarders."

2) Anger - "YOU *#!* SHOWER!!! WHY DON'T YOU JUST GET #&*! CLEAN?!?!?!  ARE YOU TO  GOOD TO GET CLEAN?!?!?!?"

3) Bargaining - "Ok shower, here is the deal; if you get clean, then I promise I'll make my kids go potty before I let them take a shower in here."

4) Depression - "WAAAAAAAAAAA!"  I'm the worse cleaner in the world!!! WAAAAAAAA!"

5) Acceptance - "Well I guess it's just stained and there is nothing I can do about it. Good thing we are only living here for a couple years, so I won't have to look at this permanently"

Then one day I saw a Pin about getting the mold out of a shower.  It sounded really simple so I gave it a shot.

The poster said she soaked cotton beauty coils (think of the cotton around your head when you got that awesome perm in the 80's) in bleach then put it on her caulk.  She left it over night and by morning the mold was gone.

Beauty coils isn't exactly something I have on hand, and I wasn't about to load up the kids to go buy some so I decided to try towels instead.

So here are my supplies. Scissors to cut my old towel into strips. A glove to protect my hand from the bleach. Tape to tape the towel on the wall. Saran wrap to put over the wet towels so they don't dry out before the bleach can work it's magic. A container to soak the towels in. Bleach


I didn't measure my towel strips at all. I just made them all wide enough to cover the caulk.  Then I put them in the container and poured in just enough bleach to get them wet.  I did this all in the shower to avoid any unwanted bleach stains. 

Using my fingers I pushed the wet towel strips onto the caulk, getting it as tight as I could.  I attempted to put the saran wrap on one but it wasn't working very well and it didn't seem like it would help so I gave up on that. 

 One of my moldy spots was on the wall so after I crammed the towel into the corner, I put tape on it.  It held up very well. 

Here is my shower bottom with all the towels in place. The smell of bleach was quickly getting strong, so I opened a window and shut the door and went about my day.
 
 4 hours later, my curiosity got the better of me and I wanted to see what was going on.  I pulled up one towel strip to check on the progress.

The Verdict: Check out the pictures below!!!!! It was ALL gone!! It was like the mold did a disappearing act.  I was expecting some sort of crud that I was going to have to wipe up, but nope. NOTHING was there.


Even the part on the wall looked great

Before

After


I no longer have to be embarrassed and grossed out by my shower. It's SOOO clean right now.  But now I have to find a good way to keep it like that so.... to be continued!

 UPDATE 12-5-12: The day after I posted this, a friend of mine told me to use a Tide Bleach Pen. That is one of those 'so obvious that why didn't I think of that' moments.  I haven't tried it but she said to just use a bleach pen on all the stained spots and leave it there for a few hours before rinsing it off.

UPDATE 3-8-2013: A few moldy spots showed up on my grout again so I tried a Bleach Pen and it worked great.  I squeezed the gel onto the mold and left it there for a few hours.  I rinsed it off and viola!  The stain was gone. It was SO easy and worked just as well as the towel method. 


Wednesday, November 7, 2012

Wrinkle Free

Lets get one thing straight....

I HATE ironing.  

I hope that was clear enough for you. There is no beating around the bush or sugar coating how I feel about ironing. 

Let me explain why I hate ironing so much.  It's really very simple.... I can't do it.  I have tried for years!

Many people have shown me their fancy sure fire never fail tricks and I still stink at it.  Try as hard as I can, I can't do it. The clothes look sloppy and uneven and it's just plain sad.

So you can understand my enthusiasm when I saw this homemade wrinkle release spray. Heck yea I was going to try it.  I went to the store just to buy the fabric softener so I could try it that day.
  • 1/3 cup liquid fabric softener
  • 1/3 cup white vinegar
  • 1/3 cup water
Mix your three ingredients and pour them into a spray bottle. Then take your wrinkled garment, place it on a hanger, spray it thoroughly (though not soaking), and give it a shake. The wrinkles will be gone in a matter of seconds! It is seriously like magic!!

I mentioned in my bathtub cleaner post, that I get really skeptical when people proclaim that something is the greatest, so when they said "it is seriously like magic" I started to doubt, but I was still hopeful and cheering for a good outcome.

I bought the cheapest fabric softener I could find and mixed everything in a spray bottle (do you have any idea how many spray bottles I have around my house right now? Way to many to count)

I have a skirt that is always wrinkly, it was the perfect victim.  I sprayed it until it was wet then gave it a good shake. 


The Verdict:   The wrinkles were gone!  Completely gone!  I was blown away.  The original person who posted this was right, it was magic!!!!


Then I went and grabbed one of my sons white shirts to see how the spray would do on those microscopic wrinkles that make a shirt look like an old piece of waded up paper. 


Again, blown away.  Of course his shirt didn't have that crisp freshly ironed look, but it was wrinkle free, and that's what's important. 

Unfortunately there is a downside, this isn't a "oh crap I'm suppose to be somewhere in 10 min and all of my clothes are wrinkled" fix.  The fabric softener left a noticeable smell, but it faded in a few days.  Also, you are spraying until the fabric is wet, and it takes time to dry.

However, these two downsides are very fixable; I now keep a bottle in my closet so when I'm hanging up clothes I can take care of the wrinkled ones right then.

I love when I find something this fantastic that makes my life easier. Now all that is left is to give my iron and ironing board their eviction notice. 

Sunday, November 4, 2012

Less Slippy More Grippy

This blog post is going to be three in one.  Don't you feel so special right now?  It's a blog post jack pot!

All three have to do with creating a grip so things don't slip. And to make this reading experience even more enjoyable, you can hum Slip Sliding Away by Paul Simon to yourself.

Lets start with hangers.  For some reason I have a plethora of wide necked shirts right now.  Because of those wide necks, I frequently find shirts on my floor and have to re-hang them..... ok lets be honest, I kick them into the corner and forget they are there until the pile is creeping out of the closet.

On Pinterest there is a picture of a hanger with a hot glue gun zig zag pattern on it.  I wish I could credit the source, but clicking on the picture just took me to a blocked site. Good thing the picture was pretty self explanatory and I didn't need the website for details.

So I got a hot glue gun and I put zig zags on one hanger and straight lines on the other, just to see if the pattern made a difference.

The Verdict: The lines just pealed right off and did nothing but the zig zag worked great. My shirts don't fall off anymore.  The only down fall is I can no longer grab a shirt and pull until it pops of the hanger and the hanger shoots into the air and does an awesome spin around the pole.


Grip number 2: The floor mat

The mat we have that leads into the garage drives me nuts.  That thing is NEVER in the right place. Just breathing next to it makes it take to flight.

So I decided to try the caulk method. I got a cheap tube of caulk and ran lines down the back of my mat, about 3 inches apart.  I let it dry over night then put it back onto the floor.


The Verdict:  It helped a little.  It now takes a sneeze instead of a slight breath to move the mat.  The caulk doesn't really grip. I think the only reason the mat stays a little more put is because it's heavier.  Plus if you stand on the mat with bare feet you can feel the lines of caulk and it's pretty annoying. 


And finally, socks.
My son needed new socks and I could not find any with grips on the bottom.  Either I am blind and just couldn't see them in the 200 stores I went to, or they don't make socks with grips for his size.  I prefer the second option, it helps my pride.

I saw this website about putting puff pant on the bottom of socks and I LOVED it. I thought the designs this women had were SO cute.  So I bought some socks and puff paint then I remembered that I have no artistic skills and if I even attempted to make something cute it would turn into a big sad blob. 

So I was very boring and just put my sons initials on the bottom of his sock with simple blue puff paint.


The Verdict: It seems to work very well.  He doesn't wear socks often, but when he does I haven't seen him slip, and he tends to run pretty fast in the kitchen.

So there you have it, a three in one special.  Merry Sunday