Thursday, August 29, 2013

Listerine Foot Soak

Many moons ago I saw a Pin about a Listerine foot soak.  Since then I've heard a few people saying that they love it.

I wanted to wait until my feet were really dry and cracked before I tried it, but summer is coming to an end and my feet are still in good shape. 

No, I'm not blessed with wonderfully self healing feet,  I mow the lawn in flip flops each week (I live life on the edge), and the only way to get the green stain off is to scrub my feet with a pumice stone. 

I've decided to finally bite the bullet and see how it works.

There are two different soaks I've seen on Pinterest so I tried them both, one on each foot.

Listerine and Vinegar Soak
You Will Need:
1/4 cup Listerine
1/4 cup vinegar
1/2 cup warm water

Directions:
Soak your feet for 10 minutes and when you take them out the dead skin will practically wipe off.  

Listerine and Shaving Cream Soak
 You Will Need:
Shaving Cream
Listerine
Warm water

Directions:
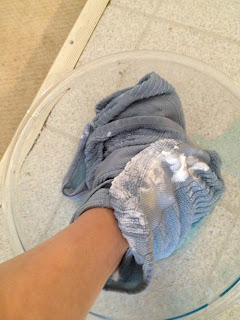
In a bucket, combine equal parts Listerine and warm water.  Soak a towel in the mixture.  Cover your foot with the shaving cream then wrap the soaked towel around your foot. Soak your foot for 30 min then use the towel to rub everything off.  

 Apparently any Listerine will work, but the blue kind is the most popular.  So I grabbed some of that then started with the Listerine and vinegar soak on my right foot.

I had to double the recipe to get it deep enough to cover most of my foot, and I wish I grabbed a bigger bowl.  My toes were cramping by the end of the 10 minutes.


The Verdict: The bad news is, it stained my skin a light blue.  It's hard to see in the photo but if you look closely you can see my toes on my right foot look a bit sickly, but it was gone by the next morning.

The good news is, it worked pretty good.  My foot was really soft and most of the dry dead skin came off. 

Before

After


Eventually I stopped admiring my right foot and started on the left with the Listerine and shaving cream soak.  

I got the cheapest shaving cream I could find and slathered it on my foot.  


I wrapped the soaked towel around my foot and sat back to relax for 30 minutes. 


I got all cozy then reached for my book, which was still across the room where I left it. Crap!

No problem, I'll read the book I have on my Kindle.... which I left on the counter by the fridge. Dang It!!

I was pretty annoyed at myself for not being more prepared, then I spied the TV remote a few feet from me.  I did an awesome scoot shuffle maneuver to reach it then enjoyed this while I soaked.
The Verdict: About 10 years ago I got hypothermia, it's a long story.  I thought I was cold then, but that as NOTHING compared to the cold my foot experienced.  As the menthol slowly seeped into my skin my foot got colder and colder.  I made it 25 minutes before I couldn't stand it anymore, but I quickly realized I couldn't do anything about it.  The cold I was experiencing was coming from the core of my foot where the menthol had set up camp.  My foot was burning cold for an hour.

But it worked, beauty is pain right?


 Overall Verdict: The shaving cream soak took more dead skin off then the vinegar soak, but it's not worth losing a limb over.  I'll be sticking with the vinegar soak. 


Monday, August 26, 2013

Reusable Paper Towels

I once saw reusable paper towels on Etsy and was very intrigued by them.  I liked the idea of having paper towels that I could use over and over again.  What I wasn't intrigued by was the price.  I'm cheap (hence all the DIY projects)

Several months later I just happen to come across a tutorial for making your own.

Reusable Paper Towels
You Will Need
Supplies (for one towel)
Basic sewing supplies
Cotton print, 11.5 x 11.5  
Terry cloth, 11.5 x 11.5
Plastic snaps and the assembly/installation tools
Coordinating thread 
and old paper towel tube

Directions:
Instead of putting a whole list of instructions that will make no sense, I suggest just going to the original website.  It has a very useful step by step guide with photos

I didn't like the idea of snaps.  I wanted to be able to quickly grab one of the towels, and not have to stop and fiddle with two snaps (yes, I'm that lazy)  So I decided to try Velcro instead.  I couldn't figure how to sew the Velcro on so I super glued it, accepting that it would probably fall off.

I got all my materials and got to work. I did half of them with terry cloth and half with an old garage towel.  I'll tell you right now, I prefer the ones with the old garage towel because it soaks up liquid faster.

My husband saw me actually using the sewing machine and asked what I was doing. I told him all about my fantastic reusable paper towels and the following conversation took place.

Him; "Sooooo, their washcloths."
Me; "No, they are cute cloths that we will have on the counter that we can use just like paper towels."
Him: "Sooooo, cute washcloths on the counter."
Me; "Ok fine Captain Obvious, they are cute washcloths that will sit on the counter."
Him; "Thank you, once again I am right."

Welcome to my marriage folks.

The Verdict: I have horrible sewing skills, but these were easy to make and not very time consuming.  The Velcro worked great (at first) and the towels rolled up on the tube with no problem. I started out with 6 then eventually made another 6.  12 seems to be a good amount.  There has only been a few times when I've gone through the whole roll before washing them.

 I've been using them for 6 months and love them.  Because I have the mentality that they are "paper towels" I use them on everything and don't care if they stain.  I've used them on things like getting chocolate frosting off the floor, and scrubbing paint off the table.   

 My favorite use for them is scrubbing the kids after dinner.  I love being able to grab a clean cloth and toss it at them.  And because it's cloth, it's a whole lot more durable then a paper towel. 

They aren't as cute as they use to be.  After about a month all the Velcro came off, which means they don't stay on the paper towel roll as nicely.  Some of the threading is starting to wear and the white terry cloth is mostly gray at this point, but you can't see it when it's all rolled up. Even though they are frumpy looking now I still love them and plan on using them until they disintegrate. 


Thursday, August 22, 2013

Honey Sweetened Strawberry Jam

 I have two little kids, which mean our peanut butter and jelly consumption is pretty high.  One day I might attempt to make my own peanut butter, but for now I'm sticking with the easy stuff.

Homemade Honey Sweetened Strawberry Jam
You Will Need:
2 pounds (~6½ cups smooshed) rinsed off, patted dry, and hulled really sweet strawberries
¼ cup honey
3 teaspoons lemon zest
¼ cup  freshly squeezed lemon juice

Directions:
Place the strawberries in a large pot and smoosh with the bottom of a glass. Add the honey, lemon zest and lemon juice and heat over medium high.  Boil, stirring every now and then, until the mixture thickens. With my really soft and juicy strawberries, this took about 45 minutes. It could take more or less time depending on your strawberries. To test, put some of the jam on a clean spoon and then put the spoon on a plate in the freezer. Let it sit in there for five minutes and then take it out. If the jam doesn’t fall easily off the spoon when you turn it to the side, it’s ready and you can take the pot off the heat. If it does pour off easily, continue cooking for another 5 minutes and try the test again. Let cool and then pour into jars and store in the fridge and for up 1 week.

 Because I'm lazy, I bought frozen berries so I wouldn't have to wash and hull them.  When they thawed they were pretty mushy which made the cooking time faster.  It was about 30 minutes until the jam was thick enough.

 I halved the recipe and ended up with just about a cup of jam

 The Verdict: It tasted nothing like store bought strawberry jam, which was a plus in my opinion.  It was very fresh and sweet.  I could see it being a little more tart depending on the strawberries you have, but you might be able to add more honey to counter that. 

My kids didn't like it, but I think that's because it was something new, and apparently it's a sin to ask a picky eater to switch their jam.  It could also have been the texture that bothered them.  It had more strawberry chunks then regular jam.

The one draw back to this is probably the time and effort.  You do have to sort of baby it, and because it's fresh it won't have a long shelf life. But to me the time is worth it.  I finished off that cup by myself in a week, and I'm not a big jam person.

Monday, August 19, 2013

DIY Bouncy Ball

Bouncy balls are pretty popular in our house.  The kids love launching them off the stairs onto the tile and watching them bounce around.  The balls don't last long though because they either get lost, or the dog snatches it and chews it.  Have you ever seen a dog chase a bouncy ball?  It's highly entertaining.
You will need:
1/2 tsp Borax

1 Tbsp corn starch

1 Tbsp Elmer's Glue-All

2 Tbsp warm water

food color (optional)

measuring spoons

2 bowls
Directions:
 Mixture #1 - 1st Bowl - Add 2 tablespoons of warm water plus 1/2 teaspoon of Borax and stir to dissolve the Borax as much as possible. Add food color to this mixture if desired & mix.
Bowl #2 - Pour in 1 tablespoon Elmer's Glue-All Add 1/2 teaspoon of the above Borax mixture and 1 tablespoon corn starch DO NOT MIX! Let mixture stand for about 15 seconds then mix the ingredients until it becomes too hard to do so. You will be able to tell when the time is right - it will get clumpy and combined together. At that point, take out the mixture into your hand and quickly knead it in a circular pattern to form your ball. (Think of when you make a ball with play dough.) It starts out as a sticky, gooey mess but it quickly starts to solidify so you must mold it quickly.

After reading through the directions I decided to wait until the kids were in bed to try this one out.  It was time sensitive and involved Borax so I figured it would be easier on my own. 

I mixed up my first bowl
 Then my second bowl

 and rolled it around and around in my hand until I had a wet but firm ball. (notice the wet splotch next to the ball.  I wanted to see if it would bounce while wet, it bounced ok but left those wet spots everywhere it landed)

The Verdict: I think this is what you would call an Epic Fail! First of all, I had to babysit it for the first hour I had it sitting out to dry.  It kept schlumping on the counter so I had to keep re-rolling it into a ball.  Wet things don't like to stay in a perfect ball shape.

Eventually I gave up trying to help it keep a perfect shape and decided I didn't care if I had a lopsided ball.  When it was fully hard I got my camera and let it bounce. 

And what a bounce it was. The ball made it a full 1/2 inch off the counter.  Amaaaaaazing!


I picked it up to see if I could get a better bounce and saw this.  The dang thing had cracked after one bounce

 Did you notice the angry eyes behind my hand?  My daughter was not happy that I had a bouncy ball and wasn't sharing it with her.  You can imagine how annoyed she got when she caught me throwing it away.

Thursday, August 15, 2013

Dry Laundry Detergent

It's laundry detergent time again.

A friend told me about this one and I'll tell you right now, it's great! It uses the same ingredients as the basic laundry detergents, but without water.

Dry Laundry Detergent
You Will Need:
1 Cup Borax
1 Cup Washing Soda
1 bar of soap (you can use any soap but Ivory, Dove or Fels-Naptha work the best)

Directions:
Grate your bar of soap with either a cheese grater or food processor.  Mix all the ingredients together. Use 2 Tbsp per load. 

Grating soap by hand is a pain in the.... hand.  If you have any sort of food processor I recommend using it.  You will want to cut up the soap into smaller pieces first.

I threw the ingredients into a container, put on a lid and gave it a good shake to mix it all up.
Note: just in case your confused, the grated soap above is Ivory, the soap I used in the photo below is Fels-Naptha

The Verdict: Like I said early, this is great.  It cleans really well, there is never any residue on my clothes and the best part is it's not goopy like the basic laundry detergent.

I will usually triple the batch and it lasts me several months by using 1-2 Tbsp per load (depending on the load size and the yuckyness of it) It's quick to make and just as quick to clean up after. 

I have used Fels-Naptha and Ivory and didn't notice a difference in cleaning between the two.  

Just as a reminder (or maybe I have yet to mention this and I just think I have) I have a front loading washing machine and a water softener so your results could be different.

Hip Hip Hooray for a good laundry detergent!

Monday, August 12, 2013

Fruit Fly Trap

I'm a bit of a fruit fanatic.  I always have fresh fruit in the house and I could live off of just that, but alas, I still need those greens to keep my motor running.

Of course the fresh fruit attracts fruit flies by the thousands and of course they decide to take up permanent resident near the fruit bowl.

I kept seeing those wasp traps made out of a two liter bottle then one day I saw that you can do the same thing for fruit flies, you just change the bait. 

Bring it on bugs....

I forgot to tag the blog post I used so I can't find it, but this one gives you pretty much the same idea.

Fly Trap
You Will Need:
2 liter soda bottle
scissors
bait

Directions:
Cut the top off your soda bottle, just below the tapered neck. Remove the soda cap, turn the top upside down and place it inside the bottom of the bottle. Put the bait in the bottom of the bottle. 

The bait you use will depend on what you are trying to catch, but I kept seeing a common theme of  watered down jam.  The sweet smell should attract the flies/wasps then they should drown in the water. 

I used the 2 litre bottle I had after making the 4th of July drinks. I cut the top of the bottle off and it sat in the bottom perfectly with no seams around the edge.  I mixed enough water into the jam to make it liquid then set the bottle next to the fruit bowl.

The Verdict: Either those flies are smarter then I give them credit for, or this trap is a big dud.  I left it there for 5 days and not one fly went into that bottle.  Even when I covered the fruit bowl the flies still figured out a way to get past the seal and attack my bananas instead of going into the bottle.

I decided to try again with a different bait so I put the bottle outside on the porch and planned on cleaning it out later that day. About 5 hours later I went to get it and found this

 Apparently those flies are smart.  It looks like they only went into the bottle when it was the only option of food.  Once I saw this I decided to try a whole new method.  Stay tuned......


Wednesday, August 7, 2013

DIY Febreze

Over the last several months I have had many inquires about homemade Febreze and my answer was always the same "I haven't tried it yet, but it's on my list." I was planning on testing it eventually, but it wasn't a big priority. 

Last week when my younger sister asked about homemade Febreze she apparently didn't approve of my response because about 20 minutes later I got a text from her telling me that she just made her own and what she thought of it. 

So this blog post is courtesy of my younger sister, Pig.  Why do I call her Pig?  I have no idea, but that's been her nickname for the last 20+ years.

Homemade Febreze
You Will Need:
1/8 Cup of Your Favorite Fabric Softener
2 Tablespoons Baking Soda
Hot Tap Water - enough to fill the bottle (Pig used a 16 oz bottle)


Directions:
Pour all the ingredients into a spray bottle and shake until well mixed.  Spray onto any fabric surface. 

Looking around the Internet I have found many variations of this recipe so it looks like you could play around with the amount of ingredients until you get a combination that works for you.

Pig, mixed her ingredients together then used the spray on her couches

Disclaimer: Neither of us use store bought Febreze so we can't tell you how it compares,  all I can give you is her opinion of the homemade stuff. 

The Verdict: Pig said "My couches, the whole living room, smells super yummy." It didn't last long though.  Pig said by that evening the smell was completely gone and her couches smelt the same as they always do. 

Even though it was short lived, Pig's son enjoyed the smell while it lasted.