Sunday, June 30, 2013

DIY Butter

I'm really not a big butter person. When I do use butter it's very minimal. My husband on the other hand is a huge fan of the stuff. For him everything taste better with more butter.

So when I decided to try and make my own, I had to rely on his expertise and get his opinion for this post.

Blender Butter
You Will Need:
1 cup heavy cream
ice water
blender
strainer

Directions:
You want to start with the cream at room temperature…it will go a lot faster that way. Pour the cream into the blender. Add salt to taste if desired. I used about a 1/4 teaspoon. Blend on medium-high speed for 3-5 (or more) minutes. How long this step takes will be highly dependent on your blender. It could take up to 10 minutes in an older blender.  Just keep an eye on it and when the butter starts to separate into butter and buttermilk stop the blender. Let the cream sit for a minute or two as the butter rises to the top. Pour the buttermilk off into another container. This next step is highly controversial in the butter-making world…to RINSE or not to RINSE! Rinsing the butter is supposed to make it last longer without spoiling (which is a good thing), but MY experience with butter is that it really doesn’t last that long around our house. Especially when you’re just making what is essentially one “stick”. But I decided to play if safe and did the rinsing thing because it’s really not much more work. All you do is add cold water to the blender and pulse for few seconds, then drain the water. Repeat this process until the water runs clear. Mine never really ran CLEAR, but after 6 or 7 times I figured that was good enough.Spoon butter into a strainer to drain. At this point you can pack your butter into molds or form it into a log like I did. Stick it in the refrigerator to chill.

 When my whipping cream was just about room temperature I poured it into the blender and turned it on full blast. 

 It was only about 2 minutes later that I had this.  I was surprised at how quickly things separated.


I put a strainer over a bowel then dumped the entire contents of the blender onto the strainer. I used a fork to smash the butter a bit and was able to get a good amount of buttermilk out.  

From the original directions it sounds like rinsing the butter may not be necessary but I decided to go ahead a do it. So I put the butter back into the blender, added water, gave it a quick pulse, poured the water out then repeated. 10 repeats later my water still wasn't clear and I was losing patients, so I figured that was good enough. 

I slapped my butter into a little container and let it chill in the fridge.  I had about the equivalent of one stick of butter

 The Verdict: Like I said before, I'm not a butter person so I had to get my husbands opinion on this one.  I had him use it for a few days then asked him what he thought.  He wasn't a fan for a few reasons. It was rock solid so he couldn't spread it on anything.  If he tried to leave it out to soften, it became to liquidity.  He said it didn't cook well and it didn't taste like butter at all, in fact it didn't have much of a taste, even with salt.

The curiosity got to me and I decided to make another batch and try it myself.  I agree with everything he said.  I tried to put it in my Butter Bell to see if that would keep it at a soft spreadable consistency, but it just kept falling out.

I'll be sticking with the store bought butter.


Wednesday, June 26, 2013

Gel Air Freshener

So far I'm 0 for 2 with making my own air freshener. Let's hope that I can redeem myself by trying a homemade gel air freshener.

Gel Air Freshener
You Will Need:
plain, unflavored gelatin or pectin
water for preparing gelatin
food coloring (optional, just for added flair)
essential oils
small glass jars or bowls  (I filled three with 2 cups of finished gelatin)
1 tablespoon salt (prevents mold)

Directions:
To make this, place 1-2 drops of food coloring in each of your glass jars or bowls, and then prepare the gelatin according to the package directions, adding the salt during boiling. Once the gelatin has dissolved in the water and it's ready to set, add 20-30 drops of essential oil and mix. Then pour into your individual containers and mix with the food coloring.  Check the strength of the smell at this time and add more oil if necessary.

I wanted to try three different scents so I grabbed Lavender essential oil, then I grabbed Eucalyptus and Citrus fragrance oils.  
 I followed the instructions and I put 20 drops of each oil into the glasses. The scent was pretty strong so I figured the 20 drops was plenty.  For some reason my gelatin rebelled and didn't want to set up when it was suppose to.  It took 24 hours before it finally turned into a gel.  I have no idea why.  It was just trying to annoy me I guess, it worked.

 Each glass was assigned a bathroom (each bathroom is roughly the same size) and I started the countdown to see how long the scent would last from each jar.

The Verdict: The citrus oil pooped out after 3 hours.  Even if my nose was in the glass I couldn't smell anything.  The lavender made it 9 days before it called it quits.  The eucalyptus made it a full 2 weeks.  Unfortunately, I don't know if it's the type of oil or the scent that made the eucalyptus out last the others.

By the time I took the eucalyptus out of the bathroom it was looking pretty depleted.  The gel was mostly evaporated (I didn't know gel did that) and it had left a green gooey funk around the edge of the glass.  It washed off very easily though. 
 Even though some of the scents didn't last long and if you try this you will have to experiment to find the right oil and scent to make it worth your while, I'm calling this a success, mostly because I don't want to be 0 for 3


Sunday, June 23, 2013

Detox Drink That Boosts Your Metabolism.

Summer has been slow coming, but the heat is on the rise and there have been several times where I have found myself slightly dehydrated.  Not a good idea when I'm prone to heat stroke. 

I knew I needed to up my water intake so I started to look online to see if there were any little tricks to help remind me.  I came across a blog about a drink that can help detox, enrich and raise your metabolism.

You mean I can get hydrated, boost my metabolism AND detox all at the same time?  Uh, yes please!

Metabolism Boosting Detox Drink
You Will Need:
1 gallon of water 
1 Lemon
1/2 a cucumber 
a handful of fresh mint leaves

Directions: 
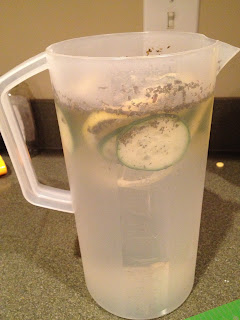
Slice the cucumber and lemons into decently thin slices, the more you cut it open the more flavor your going to get out of it.Decide whether or not you want to crush your mint. Throw all of it into a gallon of water let sit over night (about 8 hours) Wake up and enjoy the rest of the day! Note: water will get bitter if it sits longer then 24 hours. Note: for a list of how each ingredient helps with your metabolism and detox please see the original site.

The original poster said she drinks 1/2 - 1 gallon of this 3 times a week and it helps her lose a lot of weight, like 8lbs in a week (insert skeptical single eye brow raise).  My plan was to drink 1/2 gallon every other day for 3 weeks while keeping my exercise routine and diet the same.

The Verdict: First of all, if you don't like the flavor of any of the ingredients then you might as well not even try.  I was amazed at how distinctive the taste was for the lemons, cucumbers, and mint.  It was a bit of a taste bud overload at first but I got use to it and it was pretty refreshing.

But the real verdict that I know your dying to know is, did I lose weight?  Did this amazing drink help me shed those pesky pounds?  Nope! Swing and a miss. Some how I actually gained a pound.  Other then feeling more hydrated, I didn't notice any difference. 

The original poster said that she does this with a very healthy diet and she exercises 5 days a week, so I'm wondering if it's not the drink itself that caused her to lose all that weight, but the diet and exercise.  I could be wrong. It's been known to happen.


Sunday, June 16, 2013

Happy Father's Day

Happy Fathers Day everyone!

My husband shared this clip with me and I love it.


Wednesday, June 12, 2013

DIY Watercolors

Do remember my little artist? It looks like her wall coloring days are finally over, but she hasn't given up on the arts.  She paints at least 4 times a week and she takes it very seriously.  It's pretty impressive how fast we go through Crayola Watercolors.  When I saw a blog about making your own watercolors, I couldn't resist trying it out.

Homemade Watercolor Paints
You Will Need:
4 tbsp baking soda
2 tbsp white vinegar
1/2 tsp light corn syrup
2 tbsp corn starch
liquid food colouring
container to keep your paints in such as ice-cube tray, small plastic cups, plastic egg carton etc.

Directions:
Mix your baking soda and vinegar together and wait for the fizzing to stop.  It’s handy if you mix in a container that has a spout. Add your corn syrup and corn starch, and mix well until the corn starch has dissolved. Pour into your containers. Now, get out your colours and have some fun!  Use toothpicks and Popsicle sticks for adding your colours, and stir for about a minute to make sure the colour is mixed in well.  Let your paints “set up” and dry. Once they’re hard, simply grab a paint brush and some water and get painting

 I mixed all the ingredients and ended up with a consistency I wasn't expecting.  It was almost like runny play dough.  It was similar to Magic Mud.
One of the watercolor trays was almost empty so I washed it out and filled each section with a little bit of the mixture.
 I then added food coloring and started to mix with a toothpick.  About halfway through I was wishing I used a bigger container.  Because the mixture was a semi solid it was hard to mix in the food coloring in such a small container. It kept spilling over the sides and make a decent mess.  Note: if you put a lot of food coloring drops in, you might need to add a bit more corn starch to compensate.

It only took about about 5 hours to dry, but apparently it can take up to 2 days, depending on how big your containers are and what the air temperature is. 

I handed my daughter the paints, water, paper and a brush and let her go to town.

The Verdict: Yes and no. Let me explain the yes first.

I loved the colors.  They seemed a lot more vibrant and I loved that they were all custom.  We had about 4 different shades of blue.

Check out these textures.  You can't get that with regular water colors.   If you look closely, you can see how the paper is wet around the colors.  It took a bit longer to dry then regular watercolors, but it dried just fine. 

Now let me explain the no.

Because of the baking soda and cornstarch, the water from the brush would get sucked into the paint and no paint would get onto the brush.  We had to dip the brush into the water then back into the paint a few times until paint would get onto the brush.
 If you don't get the exact amount of water you either have no paint on your brush, or you end up with a big soupy mess
 The darker colors stained my daughters skin.  Not a lot, it was faint after I washed her hands, but it still stained.


Overall: It worked and I thought it was great, but my daughter got really frustrated with it because she couldn't get the water to paint ratio right. This is one that I would categorize as an older child product. 


Sunday, June 9, 2013

Coconut Oil Moisture Treatment

Ok folks, I am doing another short and sweet post today.  I have a two year old on my lap that refuses to leave my side today and a 4 year old that wants me to see every new addition he adds to his Lego house and I'm not feeling to hot. So here we go

Coconut Oil Moisture Treatment 
You Will Need:
Coconut oil
Hair clip
Shower clip
Blow dryer (optional)

Directions:
Flip your head upside down and rub the oil into your hair, saturating it completely. Once your hair is soaked with oil, twist your hair into a bun or ponytail. You can clip it in place by grabbing some hair from your scalp and part of the bun, or use a hair tie to keep it in place.  Cover your hair with a shower cap. You can choose to apply heat or not. Applying heat will open the cuticle of each strand so the coconut oil can penetrate the core faster. Leave the coconut oil on your hair for at least 30 minutes without heat, or 15 minutes with heat. You can use a hair dryer to apply heat over the shower cap.  Once your time is up wash and condition your hair as you normally would. You may need to wash your hair twice to rinse away all of the oil.

 Even though my hair is short, it's abnormally thick so I ended up using twice this amount.
 I rubbed it in all over until my hair was one big grease ball. Several drops escaped and fell so you might want to do this over a bathtub or towel.

 I pulled it up into a bun, threw on a shower cap and went about my business.  I left it on for 45 min while my son and I had a rip roaring good time playing Chutes and Ladders. 
 The Verdict: I washed my hair twice then styled it like usual.  I was amazed at how soft it was.  I couldn't keep my hands away from my hair.  BUT, it wasn't a "wow my hair is so healthy" kind of soft, it was more of a "I have coconut oil residue in my hair" soft.  When I washed my hair again it felt the same as it always does. 

So even though my hair felt great, I would say this is a bust since the softness only lasted through one wash.  Although, I may try it again and use the blow dryer next time.  Using heat could make a big difference.


Wednesday, June 5, 2013

Book Safe

When I was younger I had a strange obsession with catalogs.  I would hide them in my bed and look at every picture in each catalog before going to sleep.  While most girls my age were reading The Babysitters Club, I was checking out what new erasers Oriental Trading was selling. One day I saw a picture of a book safe.  It was a book you could hide on your book shelf, but instead of pages there was a secret door that you could hide things in. 

I thought it was the most incredible thing and HAD to have one.  So I saved my pennies, filled out the card and waited the 6-8 weeks for that book to arrive in the mail. Needless to say, when that book safe arrived I was pretty disappointed.  My super sweet mysterious book turned out to be a pathetic looking piece of plastic that had no resemblance to a book. 

Recently, when I saw a Pin about making my own book safe I knew I had to do it.  Not because I was planning on actually hiding things in it, but I needed to finally have my cool book safe so I could close the chapter on that part of my life (pun intended).

DIY Book Safe
You Will Need:
Hardcover book
Glue
Paint brush
Wax paper
Xacto knife 
Metal ruler

Directions:
Lay the pages on any wax paper-lined surface with an edge. Pin the first few pages of the book to the front and rear covers and weigh the rest of the pages down so they don’t move. Mix some glue and water together. I used about a 4:1 ratio of wood glue to water (if you’re making one book, you should mix one tablespoon of glue with 3/4 teaspoon of water). Glue the outer edges of the pages together with a brush to ensure that the pages don’t move when you cut them out later on.When you’ve put on a thick coat, unclip the covers and let the rear cover hang off the edge. Place some wax paper between the clean pages/front cover and the glued pages to separate them. Weigh down the book so the wet pages don’t wrinkle and swell.After a couple of hours, put on a second coat of glue and let it dry overnight. Don’t throw the wax paper away after this step. You’ll use it later on. The glue dries pretty clear and should hold the pages firmly.  To cut out the cavity, use a metal ruler to make straight cuts with an Xacto knife. Buy extra blades; it’s worth it. After you’ve cut fifty pages or so, you can stop using the ruler. This is tedious work, but you have to be patient and take your time or else the cuts will become uneven and angled. Go into this step knowing it’ll take about forty-five minutes to finish.  When you get near the bottom cover, insert a sheet pan or something else you don’t mind scraping up between the pages and the back cover. This is to keep the inside of your book nice and neat. Once the cavity is cut out and you’ve cleaned up the edges with your Xacto knife, it’s time to glue again. Mix another batch of the glue/water mixture. Put your book back on the wax paper with the bottom cover hanging over the edge. Brush the glue all over the inner pages. If you glued the back cover to the pages now, the excess glue would pool inside your safe. The glue will hide most of your imperfections when it dries. Put on a thick coat and place the wax paper between the glued pages and the clean pages/front cover. Let it dry overnight under a heavy weight, just like before. The next day, all you have to do is glue the back cover to the glued pages and glue the first clean page over the cavity to hide your errant cuts. Weigh the book down again and let the glue dry for a few hours. When the glue is dry, cut the top page to reveal the cavity

I searched my book collection and found one that I knew I wouldn't be reading again.

I pinned the front and back cover together and included the first few pages of the book.


 I mixed some Elmer's glue and water and painted it all over the edges


 I undid the clip that was holding the covers together, put some wax paper all around the glued areas then put a box of china on top of the book.  It was the heaviest thing I could find.


 A few hours later I put a second coat of glue on, then I let it sit over night.
 Using a metal ruler as a guide I started to cut away at the pages.  I was able to cut through about 10 pages at a time.  After about 50 pages I stopped using the ruler because it was deep enough that the previous cut papers could be a guide.

So I cut, then cut, cut some more, cursed, screamed, cried and wondered why in the world I was doing this. 


The Verdict: This took me many, many hours over the course of 3 days.  The deeper I got the harder it was to get the razor in and the harder it was to cut straight lines. Part of the problem could be that I had a thick utility razor instead of an Xacto knife. But it was also harder to get my fingers around the cut edges to pull the pages out.

About halfway through, this book started to put up such a huge fight that I'm pretty sure I saw the face of Tom Riddle laughing at me. 

The edges started to fray really bad and I eventually got so annoyed at them that I got a lighter and burned them away so by the time I was done I was left with a pretty unappealing mess. 


On the bright side, the outside of the book looks perfectly normal.  Can you guess which one it is?


 So what did I learn from all this?  Use a thin book.  Around page 300 is when things went from simple to hard, my book was about 700 pages.

Sunday, June 2, 2013

Simply Smoking Weed Killer

Last October I attempted a homemade weed killer that failed miserably.  I was so annoyed at those mutant weeds that I spent all winter planning their demise. Well little plants, it's spring, and you have sprung, and now it's time for you to run. 

When I started to look for another weed killer I knew I needed something different, something that didn't have vinegar or salt in it because clearly that didn't work last time. 

Simply Smoking Week Killer
You Will Need:
Boiling water

Pour boiling water on the weeds! Within a few hours, the plants will be dead, their leaves and roots shriveled up, brown and cooked. The hot water kills them from the inside out.

 If your like me your probably a bit skeptical.  Just boiling water?  That's it?  Worth a shot.

So I boiled a huge pot of water then carried it outside.  I poured enough water on each weed to fully saturate it, and the ground around it.  Several hours later I went back outside to see if those suckers were still holding on.

The Verdict: SUCCESS!!!! Take THAT you vile fiends.  (I really don't like weeds if you couldn't tell.)  Those plants shriveled up and died, roots and all. 


Unfortunately this method kills pretty much all living plants, so you have to be careful where you pour it.  And if your smarter then me, which I'm pretty sure you are, then you will get close to the ground before pouring the water as to avoid splashing on your unprotected toes.