My favorite candy bar of all time is Almond Joy. It's not so much the coconuty and almond goodness, but the nostalgia I have for it. The only time I ever had Almond Joys growing up was when my dad went hunting. He would buy them on his trips and when he came back there was always left overs in his cooler.
This brings us to our post for the day
Almond Coconut Candy Bars
yield: 30-40 candy bars, depending on how you cut them
7 ounces sweetened condensed milk (half a standard 14-oz can)
1 tsp vanilla extract
1/4 tsp salt
2 cups powdered sugar
14 ounces (about 2-1/2 cups) shredded coconut
3/4 cup whole roasted almonds
1 lb chopped dark chocolate, or chocolate candy coating
Directions: Line a 9x13-inch pan with aluminum foil and spraying the foil with nonstick cooking spray. In a large bowl, combine the sweetened condensed milk, the vanilla, and the salt. Stir them together until they're well-mixed. If your room is fairly cold and the condensed milk is thick and hard to stir, microwave it for 10-15 seconds, just so that it loosens up and is easier to work with. Next add the powdered sugar to the bowl with condensed milk, and stir it in. It may be difficult to incorporate it all at first, but keep stirring and you should soon have a thick, smooth mixture like this. Now for the star ingredient: the coconut. Add it all at once and mix it with the condensed milk until there are no dry patches remaining. This can be done with a mixer, but I like using a wooden spoon. Your final coconut mixture should be sticky but fairly stiff. If it's runny add a bit more coconut, and if it's very dry, add a bit more condensed milk. Coconut can have different moisture levels depending on its age and how it was stored, so there's some trial and error involved in getting a texture you love. Scrape the coconut into the prepared pan. Wet your palms and press the coconut into a thin, even layer. You can control how thick you want the coconut layer to be. I prefer my coconut to be about 1/2-inch thick, so I don't cover the entire pan--I use about 3/4 of it and leave the rest of the pan empty. Use a knife or a pizza wheel to lightly mark the top of the coconut into bars. This is optional, but it keeps your candy bars the same size and helps immensely in almond placement. Take your almonds and press them into the sticky coconut. I use 2 per bar, to stay traditional, but you can use more or less, to taste. Once all the almonds are placed, refrigerate your pan to firm up the coconut, for about an hour. Once the coconut is firm enough to cut, take it out of the refrigerator. Lift the candy from the pan using the foil as handles. Use a large sharp knife to cut your bars along the lines you marked earlier. Place your chopped chocolate or candy coating in a microwave-safe bowl and microwave it in 30-second increments. Stir it after every 30 seconds so that it doesn't overheat. When it's melted and smooth, use forks or dipping tools to dunk each candy bar in the chocolate, then tap it against the lip of the bowl to remove any excess chocolate. Place the bars on a foil-lined baking sheet to set while you dip the rest. Refrigerate the tray to set the chocolate for about 10 minutes.
Did you catch all that? If your feeling overwhelmed by the directions then I recommend you go to the link. The directions are broken down with pictures for an easier to read, step by step process.
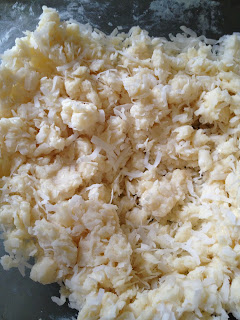
I mixed the first four ingredients until it was pretty thick and hard to stir. I then added the coconut until I had a consistency that was wet and sticky, but not to dry. When I squished it together it stayed together.

After it sat in the fridge lone enough, I took them out and cut all the way through the bars. It was pretty easy to do so, but some of them seemed a bit flaky and dry.
Then it was time to dip them in the melted chocolate. I chose to do milk chocolate instead of dark chocolate. I'm not a big fan of dark chocolate, and Almond Joys are made of milk chocolate. As I started to dip them I quickly got frustrated because they were falling apart big time. The Almonds were sliding all over the place and bits of coconut kept falling into my chocolate.
Eventually there were so many coconut flakes in the chocolate that my bars went from looking like this.....
To this. Even though they looked horrible, I still had hopes that they would taste great.
The Verdict: I never realized how much Almond Joys don't taste like coconut. I bought an Almond Joy so I could compare the two and I was really surprised at how much they differed in coconut taste. The homemade version has a sort of fresh taste to it. Like the coconut was fresh.
The homemade one is EXTREMELY sweet. Clearly I should have stuck with the dark chocolate like the original poster had in the recipe.


almond joys are yummy nummy. haha I like your comparison pic!
ReplyDeleteWeight Loss in spite of office work and the lack of sports activities;;;;;;.
ReplyDelete